How to mine 0xBitcoin on CVP-13
Hardware Requirements:
1. Bittware CVP-13.
2. A 64-bit pc running windows 7 or newer.
3. An efficient and reliable powersupply with a absolute minimum of 400 watts of power available per card.
4. 1x free USB-port per card.
5. Direct airflow on the FGPA card. This will significantly increase cooling performance on the power supply and board.
Software Requirements:
1. Vivado Lab Edition
2. FTDI D2XX Driver
3. Microsoft Visual C++ 2013
4. Bitstream and mining software from whitefire.
5. Bittware Board Monitor to monitor board tempratures and adjust FPGA core voltage.
Step 1: Hardware Installation
While your computer is shut down install the two 8-pin pci-e power cables located on the top and right side of the CVP-13. I would recommend not using split pci-e power cables on the CVP-13 due to a very high power consumption. Also connect the provided USB to Micro USB cable to your computer and CVP-13. The Micro USB port on the CVP-13 is located on the bottom left of the board. The pci-e interface and power are not required on the CVP-13 but may be needed for future bitstreams.

Step 2: Software
Download and install the FTDI D2XX Driver, Microsoft Visual C++ 2013 Redistributable and Bittware Board Monitor. Below you will find the download links ▼
FTDI D2XX: http://www.ftdichip.com/Drivers/CDM/CDM21228_Setup.zip
Microsoft Visual C++: https://www.microsoft.com/en-ca/download/details.aspx?id=40784
Bittware Board Monitor has to be requested from sales@squirrelsresearch.com. Provide your order number and ask for "BittWare Toolkit Lite files".
Step 3: Vivado Lab
Download and install Vivado Lab Edition. Vivado likes to keep tabs on who and what for their software is being used for. Therefor you are requierd to registre an account with them. Once registered you should be able to download Vivado labs. Below you will find the download link ▼
Vivado Lab Edition: https://www.xilinx.com/member/forms/download/xef.html?filename=Xilinx_Vivado_Lab_Win_2018.2_0614_1954.tar.gz
Step 4: Bitstream and miner from Zetheron.com
Download the bitstream and miner from http://zetheron.com/. The newest version of the bitstream and miner will be found under the downloads tab. After downloading extract the files. You should now have a file called CVP_Token_32 containing the following. Where "1" is your bitstream, "2" is your mining software and "3" is you customizable start file.

Step 5: Loading the FPGA with a bitstream
Launch Vivado lab 2018 by dubble clicking on the desktop icon. After launching, you should be greeted by this screen.
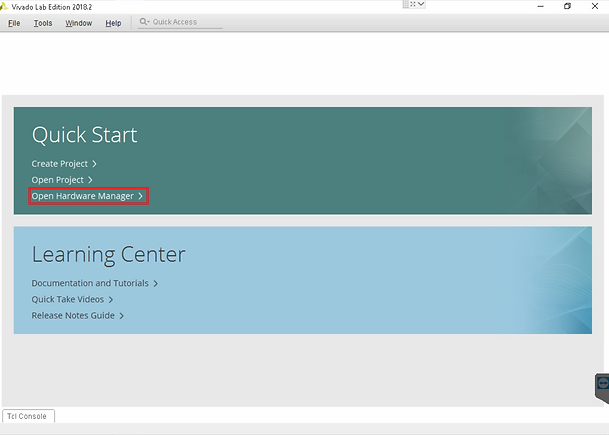
Select open "Open Hardware Manager" a new window will appear.

Select "Open target" and then "Auto Connect" a new window will appear.

You should new be able to see your CVP-13 labeled as xcvu13p. Right click on your device and select "Program Device" a new window will appear.

Now it's time to load the FPGA with a bitstream. Press the "..." icon that is marked in red and locate the bitstream you downloaded earlier in step 4. It should be called CVP_Token_32_core_A.bit. Select it and press "Program".

The device is now being programmed . This will take a minute or two. Once completed the FPGA has been programed and you can close Vivado labs completely.
Step 6: Setting up Bittware Board Monitor and adjusting fpga core voltage
After receiving and installing Bittware Toolkit Lite software open the file directory C:\Program Files\BittWare\BwTK-Lite2018.6\bin and you will see two applications called bwconfig-gui and bwmonitor gui.

Double click on bwconfig-gui and a new window will appear. Click on "Scan" and then "USB Buss". A new window will appear.

Press the "Scan"button and your device will appear as XUPWP. Select it and click on "Map selected"

You can now see that your device is installed. You can now close the BwConfig window and double click the the bwmonitor-gui application. This window will open.

Select your device and press "Connect". A new window will appear.

From this window you can monitor all your temperatures and voltages such as FPGA Core Temperature, FPGA core Voltage and the FPGA power supply temperatures. You can now see the FPGA Core voltage is set at 850 millivolts (0.85v). Token32 does not require a core voltage of 850 millivolts. The lower the voltage, the better it is for your card. I have found a sweet spot around 700 millivolts. To modify voltage simply scroll down to "FPGA" under "FPGAs" right click on it and select "Modify Core Voltage Override". A new window will appear.

Mark "Override FPGA Core Voltage", set the core to 700 millivolts and press "OK"

The FPGA core is now set to 700 millivolts.
Step 7: Configuring .Bat file and starting miner
Open the CVP_Token_32 folder and locate your "Start" file. Right click on it and select "edit".

Notepad will open and you will see this.

This is the configuration file for the miner. 1 being your miner version, 2 being the megahertz you are applying to the FPGA (how fast it FPGA will run), 3 being the pool and port you will connect to and 4 is the address you are mining to. Change these to your own. At 700 millivolts i would set the FPGA to -t 720. Save the changes and close the .bat file. The device is now ready to be mined with. Simply double click on the "start.bat" file to start mining.
Step 8: Monitoring the miner and CVP-13
When mining carefully monitor the temperature of the FPGA. I have heard that the FPGA Core is good to about 100 Celsius and the FPGA Power Supply 120 Celsius . But i recomend keeping the FPGA core lower than 80 Celsius and the power supply lower than 90 Celsius. Also monitor the miners output. If you are getting a lot of errors (more than 2-3%) you should try decreasing the frequency (-t) in the .bat file or increasing the FPGA core voltage.
